Sunday, August 12, 2012

Morning Routine Cards for Kids


Routine Chart for Kids

With the 4th baby on the way and the other 3 all going to school this fall, I needed to come up with a way to keep everyone organized and out the door on time in the morning! I started looking for just plan routine cards to help the kids visually see what they have to do but then I came across some more ideas! I happen to have everything at home already so I didn't need to buy anything. There are so many things you can do to add to and customize this chart for your family!! * Sorry for the poor picutres. Blogger isn't uploading very well right now. Click on the picture to see it bigger and clearer.

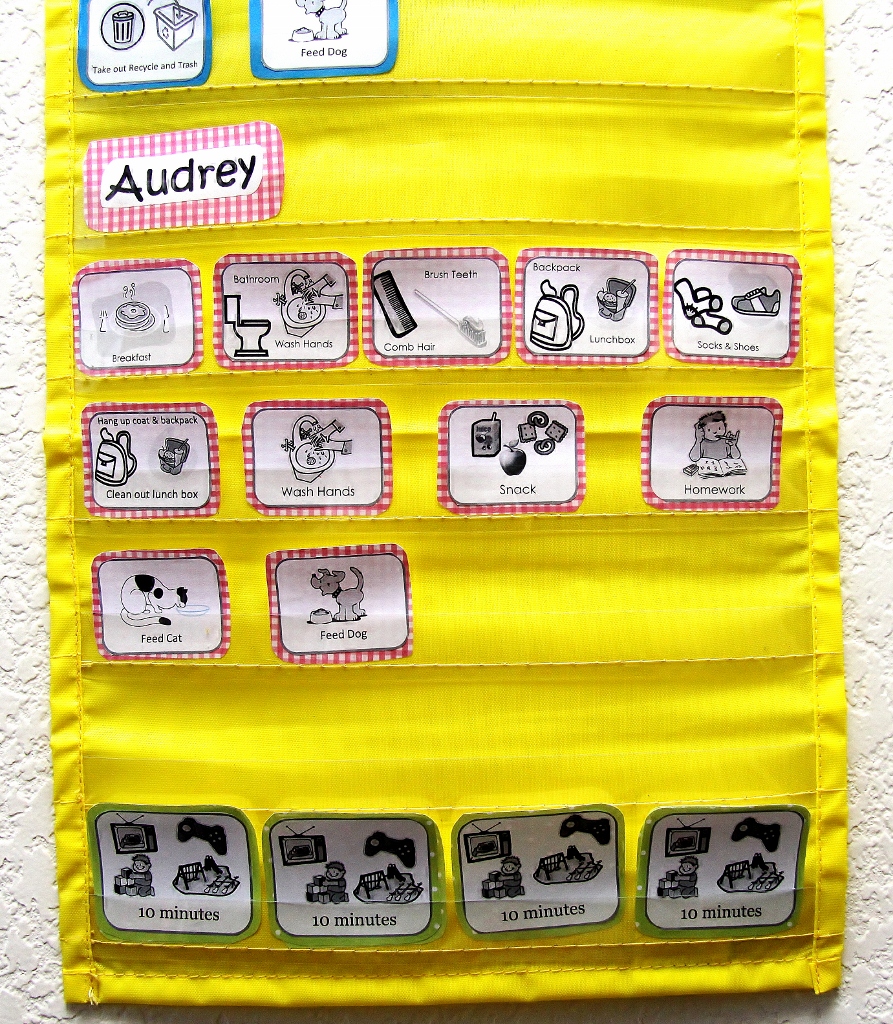
I will be using this chart as a reward chart as well. The first row of cards is their morning routine. The second row is their after school routine. The third row is their chore for the day. When they finish a row that they are suppose to be on without me asking them too, then they earn a 10 minute card. They can use this on video games, TV time, extra play time, etc...

Break Down
Total Cost: me, nothing. I had it all on hand.
Total Time: 2 hours with 3 kids interuppting! Mostly cutting time.

Materials:
Hanging Chart Holder
Scrapbook Paper
Printer with paper and ink
Glue Stick
Sissors
*Laminator*
*Laminating Sheets*

How To:


Sorry the picture is awful! Blogger is having a hard time right now! Click on the picture to see it bigger and clearer.
Print out the routine cards here Routine Cards. They are from someone else so don't be surprised when you don't see my name. If you would like to do the 10 minute reward cards, print them out here 10 minute reward cards  ** The printouts are hosted on Scribd.com. It might say you need to pay a membership fee. I didn't. Look for the "download for free" button. Then all you have to do is upload a document of any sort ( I uploaded an old recipie) and then it will let you print all you want for free!


Next glue them on to any color scrapbook paper, cardstock you wish. I used my kids favorite colors.


Now cut them out.
* I will be using a laminator to keep them durable but it's not here right now and I wanted to get this project done now. So, I suggest to make things easier with less cutting, once you glue the cards on the scrapbook paper, put it through the laminator then cut them out. I will now have to cut them a third time once I get my laminator back! Cutting was the most time consumming part of this project!*


Once he does it all without me asking, he gets a 10 minute reward card. I have them put their cards in a pile on the top row as they finish them.


Again, I'm sorry fo rthe poor photos! I'm really frustrated with Blogger right now. There is some kind of bug and it's making it difficult to post right now! Click on the pictures to see them bigger and clearer.

I hope you find this chart useful!! There are so many things you can do with it! You can have a night time routine card set. You can include more chores, rewards, etc!

If you don't have a hanging chart:
You can use a magnet strip. You can buy them at Staples. Then you just stick small magnets on the back and hang them on the magnet strip! Or hang them on a magnetic white board!

You can put velcro on the them and hang them on a velcro strip!

You can punch a hole in the top and hang them on little cup hooks!

So many different ideas!

Please post your thoughts and ideas! Someone might love them!


Thursday, June 7, 2012

Modern Day Journal to My Kids

        When I was pregnant with my first baby, I had all the time in the world to do creative things! I did scrap booking, I kept up on the baby book by putting in the day every tooth popped through, I printed all his baby pictures and kept them in a photo album and I had a journal that I wrote in, starting in pregnancy that I am eventually going to give him. You know all that fun memory stuff. Well, the second baby came and I planned on doing all that great stuff. I bought the journal, wrote in it (a little), I have a cute scrap book (that I never opened) and his baby book, well it's got the important stuff in it! The third baby...... well, as you can guess, it's all there on her shelf but I never opened any of it!!  I am now pregnant with number 4! I kick myself every time I think of all the memories I'm not writing down in their journals or baby books! I'm not to worried about the pictures I haven't printed because really, I can send them to shutterfly and they will put them in a book for me. But the journals, I really wish I had written down a lot of those funny moments or funny things that they said. These kids are hilarious!! Of course we say, "I'll always remember that one! It was too funny!" Then of course, I can't remember a single one! 
          So, my new idea (I'm sure someone else thought of this already. I'm not that creative or smart) is a modern day journal. In this day and age, a lot of us rely on technology for so much. We have smart phones, tablets, laptops, etc, all at our finger tips. It dawned on me that I can answer 10 emails, post my status on facebook, RSVP to evites, take my turn on Drawsome, schedule play dates on the calendar that will sync to all of my family's calendars, find a new project to do on Pinterest, and post my junk on Craigslist all at the drop of a hat on my phone! Yet I can't write an entry into my kids journal :-(. So, I decided to journal through email! I created an email account for each of my kids and now I can write to them whenever I want! If they say something funny, I can take 60 seconds on my phone and email it to their email! I can write to them when I'm waiting in the Dr's office, at work on lunch, when I'm a passenger in the car, when the kids are in the bath and I'm sitting on the toilet making sure they don't drown each other......anytime! Then when they are old enough, I can give them their email address and password and they can read all the wonderful things they said, did or that I wanted to tell them. I can also attached pictures to go with that entry. When I write about the day my son was curious about eyeliner and mascara going all over his face, I can take a picture with my phone and send it as an attachment with that entry! There is no way I could ever be together enough to find the camera at that perfect moment, take a picture, upload it to the computer, print it, cut it out, find the journal, and paste it in! 
          I'm very excited about this idea! I really hope you like it just as much and find it helpful for you and your children. I also gave my husband their emails so that he too can write to them! Oh!! Maybe even the grandparents! I just thought about that!! There are really a lot of things you can do with this! Let me know your ideas!!
Enjoy!!               


Late edit:      
I have had wonderful responses to this post!! I'm so happy that everyone is liking this idea! There have been some questions on how to set up multiple email accounts. So I will try to give a step by step as best I can. All the email services are so different. 

Gmail: 
          I use gmail for all my person email addresses. I really like them and have never had any problems. Go to gmail.com. It should look like this:

Click on the red button "create an account" in the top right corner.
Now it should look like this:

1. For the first and last name I used the kids name.
2. The username is what you want their email address to be.
3. Then create a password
4. For their birthday use your year. Most likely you kids are to young and gmail won't allow them to have an email. If you did use their year and it denies you, close you browser, clear you cookies and then try again.
5. Mobile phone is so they can send you your password if forgotten.
6. For the current email address I used my email. It's so you can get their username or password if you forget.
7. Next page:

8. Here you can add a photo and personalize it. Then press next step.
9. From here it will take you step by step to your email! 

As far as signing up with other email providers, I'm not sure. If you really have a problem, please let me know. Leave a comment or email me at anytime and I will figure it out and help you! : )
Have fun!!!

Friday, May 18, 2012


Baby Photo Toy

I actually saw this on Martha Stewart the other day and thought it was so easy and cute! My cousin just had a baby girl last month so I thought I would try this out on her. I used black and white photos because the baby at this point can only see in black and white. Also, I've read that they are drawn to black and white more then color at this early age.
*Make sure you read the whole post and the notes at the end before you buy everything. I write my good and bad learning experiences at the end and it could change the way you do things.*

Break Down
Total Cost: About $7
Total Time: 20 minutes

Materials:
Baby rings $3 Target
Shower curtain rings $1 Target
Self stick laminating sheets $3 for 5 Target
Hole puncher had
Pictures you want to use
Scissors
White paper


How To:
1.

Cut your pictures out just smaller then the size of the laminating sheets that you are using. You really can use any size. Larger ones, 4x6, might be easier for the baby to hold. I used "wallet size" which I think was about 2 x 3. Make sure you cut the pictures out smaller then the laminating sheets. You want enough room around the picture for the laminate to stick and seal (see picture below. I feel I should of cut the picture smaller. I would've liked a better seal). Also make sure there is enough room that if baby sucks and chews on it, which they will, it will stay sealed and not get the picture wet.
* I used the self stick laminating sheets. I have a laminator but I thought this would be easier and quicker to use. You can get these in a number of sizes, I saw them at Target. If you use your own laminator, you might have to do these steps a little different. I'm not that experienced in using the laminator.*

2.
Cut out a white, or any color you want, paper to the same size as your picture. This will be the backing you can write names or whatever you want on.


3. 
Next, punch a hole in the laminates. I find it easier to poke a hole now and then again once the picture is in it, if needed. Going through all of it once it's puts together is tough and can tear the picture. 

4.
Now using the directions on the laminating sheets, put the picture and the white paper, if used, together. It was pretty easy. Basically, open the sheets, center the picture, peel off the instructions, and seal. Just make sure you take a marker or something to smooth over the sheets to really get a good seal. 
If your picture now covers up the punched hole, use the hole puncher and punch through the picture. 

5.
Now, put the shower curtain ring through the pictures and snap shut. This is why I used the shower curtain rings, they snap shut so you can't loose the pictures. Of course they open pretty easy, with adult muscle, if and when you want to change out the pictures. 
Finally, attach the baby rings and make it as long you want! 

Last thoughts:
*This project was pretty quick and easy! I can't wait to make more! Really you can make anything for your baby to look at. Flash cards, pictures, letters, etc.... These can be attached to almost anything! High chair, stroller, car seat, crib, other toys, and if sealed well, the bath! 
* Martha Stewart used trading card protectors rather then laminating sheets, but I couldn't find those and the babies can chew on these. The trading card protectors are just a sleeve that has an opening where the baby could get the picture wet. 
* The shower curtain rings I used where pretty thick. The hole punch size allowed for the pictures to go on the "snap" part of the ring but then the pictures didn't move much. So, I used the hole puncher to make the holes bigger. I don't know if they have a bigger hole puncher but with my lack of experience, I don't have one. Once I made the hole bigger, the pictures now slide over the shower curtain ring and the baby can see the pictures better. 
* Sorry the pictures are kind of blah. I haven't been feeling great and apparently it affects my creativity! : )

I hope this is something you would like to do! Let me know how your project goes! I would love to hear from you!!

Thursday, May 17, 2012

Letter Of My Absence
    For those of you who follow this blog, I'm sorry that I have been absent and haven't posted in so long. So much has been going on in my life that this had fallen to the side. I have thought much about it and want to make sure that I get back to it and keep posting!! It might not be as often as before but I promise it will happen. If anyone has any ideas or projects for me, please let me know!! I love a good ideas!! Thanks for reading!!

PS. It might get a little baby crazy in here, I'm pregnant with number 4!!! 
    

Sunday, March 4, 2012

The No Sew, Fold Over Blanket!


I first saw this blanket at work, one of my patients in recovery had one. Poor little girl, I about attacked her (half asleep from anesthsia still) to examine and ask a million questions about it! I was so intrigued! My kids each have a "tie blanket", they call it their cozy. They love cuddling in them! When I saw this one, I wanted to make it for them right away! I thought it was really pretty and different. So off to Walmart to let the kids pick out their material. Now I thought it was going to be an easy and quick project but was I ever wrong! It takes time, patience and lots of wine! : )

Break Down:
Total Price: About $12
Total Time: 2 hours

Materials
~Fleece Material - I used three yards total but you use as much or little as you want. Just remember, you need double the size you want. You can use 2 different prints or solids too!- WalMart $4/yard
~Scissors
~A piece of card stock
~ Glass or two of wine!

1.

~ Lay out your material, one on top of the other. Cut around the edges to make sure they are even. Not perfect, just close.
~ Some tutorials on the tie blankets showed pinning the blankets together, all the way around. But I don't have the time or patiance! The material sticks together really well. I didn't have any problems.


2.


~ Depending on how long you want your strips, you need to cut a square out of your card stock using the same number. Example: My strips were about 2" long (1.5" wide) so I cut a 2" X 2" square out of card stock. ** Looking at tutorials that made the tie blankets, they cut 4" long strips so they cut out 4"X4" square. It's up to you. If you want, start with a small square, cut and thread  a strip to see if you like the length (read the rest to know what the heck I'm talking about!!). You can always goes bigger if you want.
~ Cut out all 4 corners.

3.

~ Cut your strips all around your blanket.

4.


 ~ Now to cut the small holes. I might of done it the hard way but it worked. I folded up the material, both pieces together, long ways (see picture above). It was so I could make the holes parallel to the edge of the blanket.

5.

~ Now cut a very small hole about 1/2" below your strip. See above. The further away the hole is to the bottom of the strip, the bigger the edge will be (see 2 pictures below).
~ The smaller the hole the better but it does make it harder to thread the strips through. You will learn as you go.


6.

 ~ Now take the strip and fold up and down through the hole. It can be hard when your holes are small so I used a chopstick to help push the material through.

7.


~This is what the edges look like when your done. They will get better looking with practice!!


Final Thoughts

This blanket definitely took practice. My daughter won't notice the crooked edges, mismatched strips or really messed up corners (before I learned the square trick). I made the strips so many different lengths and widths before I found what I liked. But it was fun to learn! I will do better on my boys blankets!
I have never seen this done before so I don't know what it's called. Therefore I will call it the "No Sew, Fold over Blanket"!  

Please leave comments or ideas. I know this is out there somewhere. I did not make it up (I'm not that brilliant)!

Cheers!

Monday, February 20, 2012

Baked Zucchini


Pinterest is also full of so many yummy recipes! I, like most everyone out there, try to find healthy food that will taste good and that our kids will eat! I found these baked zucchini
"fries" that the kids actually ate! Of course I had to dip them in red sauce but marinara isn't to unhealthy.


Details:
Very easy
Not very expensive. Varies by store.
Prep Time: 10 min Cooking Time: 20 min
WW points: 1.3 per serving (recipe makes 3 servings)

Materials:


3 medium zucchini
1 large egg white
1/3 cup seasoned bread crumbs
2 tbsp grated Pecorino Romano cheese (I used Italian Mix)
cooking spray
1/4 tsp garlic powder
salt
fresh pepper
dipping sauce of choice

1. Preheat oven to 425°.
2. In a small bowl, beat egg whites and season with salt and pepper.
3. In a ziplock bag, place breadcrumbs, garlic powder and cheese and shake well.
4. Spray cookie sheet with cooking spray and set aside.
5. Cut zucchini into small strips. Make them about the same time so they cook even.
6. Dip zucchini sticks into eggs then into bread crumb and cheese mixture, a few at a time and shake to coat.


7. Place the breaded zucchini in a single layer and spray more cooking spray on top.

8. Bake at 425° for about 20-25 minutes, or until golden brown. Serve with 1/2 cup marinara sauce for dipping (.5 pt)

I really enjoyed these! My husband liked them too! You can also add any spices that you'd like!

ENJOY!!

Here is the website I got the recipe from:

Wednesday, February 15, 2012

Bling Shoes


I saw these on Pinterest and thought "oh no, way to much for a little girl!" As I continued to scroll through Pinterest, I kept coming across them. They soon began to grow on me and I wanted them for my daughter! * Lightbulb!* Another Adventures in Pinterestig project!

Details:
About $26 to make
Time consuming- about 1 hour
Not to difficult if you can deal with tiny pieces

Materials:

Shoes- I love Converse! $17.99 Target
Bling- I used Bling on a Roll by Recollections. $4 Michaels
Toothpicks
Ribbon- of your choice. $1 Michaels
Amazing Goop- borrowed mine

1.
Clean the rubber where the bling will go. I used soap and water. Rubbing alcohol might work well too. Makes sure it's really dry.

2.
Put your bling on. The Bling on a roll are jewels with a tacky back, all connected. I actually used this as a cheat! I just pealed and placed! They sticky is pretty gooey and they aren't moving very easy BUT I have not let her wear them yet! So, I used the Amazing Goop on the 2nd row (second as in second strip) down. I just squeezed a strip of Goop and placed the bling on top.
**Here lies the frustrating part. Making the bling look good and line up. Different size shoes will line up differently. My shoes were Toddler 6. Towards the bottom I cut the jewels into singles and placed them where they looked good and fit. I used the toothpicks to help place them.  It took time and patience's! And by all means, it's not perfect!

3.
Thread the ribbon for laces. This is an option. Of course the ribbon will bunch up, get dirty, come un-tied a million times a day, but it's up to you!! It does look adorable!!
Notes:
*Now, this project is in no way useful, needed, super easy, cheap or practical but it does look cute! Not one of my favorite projects but I tried it and probably won't do it again.
* There is special glue, tools and more expensive quality jewels out there but I wasn't doing this to resale and make money. I did these to try out and give my daughter some cute shoes that she LOVES! They grow out of them before they even wear them out!!
* So have fun. Put bling all over the shoes if you want! You can be as creative as you like!!


The Pinterest inspiration:                                                    What I did:
(This one did not have the original
website attached to it.)
Famous Footwear has cute converse for cheap.


Sunday, February 12, 2012

Melted Heart Crayons


These are so cute!! They really weren't that hard to make but having never done it before, there was some trial and error. Remember, I'm not really that creative so some things that would be common sense to some, really aren't to me. This is why I do this blog! For us "creatively challenged" people!!

The project on saw on Pinterest, for one, didn't really give detailed instructions, and two, glued these hearts to card stock with little messages on them for Valentine's Day. A lot of the comments from that project were about not being able to keep the hearts on the card stock without hot gluing. I don't want the kids to have hot glue on their crayons! So, I was determined to make these for my sons class and make them just as adorable without the hot glue!

Details:
            Cheap! Most parents have a million broken crayons around the house!
            Easy (once you use my detailed directions).
            Not to time consuming, especially if you have your husband help cut the crayons!
            So many different shapes you can use for any occasion!

Materials:

          I used hearted shaped, silicone molds from Target. about $2 (last year)
          Crayons. Best to use all the same brand. Free or about $1-4 anywhere
          Blade or sharp knife
          Baking sheet (not pictured)
          (I didn't use the colored pencils pictured)

1.  Preheat oven to 230.
2. 


Strip your crayons of all the paper. The quickest way I found was to gently cut the paper down the crayon lengthwise. Then it just falls off in one piece. I also found out the hard way that using crayons of all the same brand work much better! When I used all different kinds, some melted and some didn't. I ended up throwing some out.

3.


Cut the crayons, with the blade or knife, into about 1/4 inch pieces and place them in the silicone molds. Again, I learned the hard way, make sure they are all about the same small size. I know, common sense to some I'm sure, but me.......I just don't have crafting common sense! By the way, I made my husband cut up most of the crayons! It wasn't hard at all, I just wanted him to help!

Fill the molds all the way to the top but make sure as it melts, it won't spill over. Try to arrange the pieces so that you fit as many as possible in each heart. You want them as thick as possible so the kids don't break them as they color.

4.


Place the silicone molds on a baking sheet. These helps when you take them out of the oven they stay even and don't spill.

5.
Place on the middle rack in the oven at 230 for 15 minutes. I did 5 minutes at a time to watch them carefully. Remember all ovens are different!

6.


Let cool for at least 30 minutes. I'm sure it depends on how thick yours are. My first batch I let cool over night only because I pulled them out at 11pm and went to bed.

Then "pop" them out. They come out pretty easy. I think the silicone is the way to go with these. I couldn't imagine trying to get these out of something hard.


Then I put them in a cute bag with a note on it! Must easier then hot gluing them all to card stock!
* My son goes to a Spanish immersion school so they are in Spanish and I've blocked out his last name. They say "You Color My World!"*
 BUT because I'm a busy mom and had a whole lot of things to do this weekend, I ended up making little simple baggies. They were much quicker! Besides the kids wouldn't appreciate the nicer one anyways!

** It says "You Color My World!" **
Notes:

So, I changed up the original Pinterest post a bit and came up with my own ideas. Over all a great and easy project! I will do these for Halloween and Christmas too!
Have fun!!