Monday, February 20, 2012

Baked Zucchini


Pinterest is also full of so many yummy recipes! I, like most everyone out there, try to find healthy food that will taste good and that our kids will eat! I found these baked zucchini
"fries" that the kids actually ate! Of course I had to dip them in red sauce but marinara isn't to unhealthy.


Details:
Very easy
Not very expensive. Varies by store.
Prep Time: 10 min Cooking Time: 20 min
WW points: 1.3 per serving (recipe makes 3 servings)

Materials:


3 medium zucchini
1 large egg white
1/3 cup seasoned bread crumbs
2 tbsp grated Pecorino Romano cheese (I used Italian Mix)
cooking spray
1/4 tsp garlic powder
salt
fresh pepper
dipping sauce of choice

1. Preheat oven to 425°.
2. In a small bowl, beat egg whites and season with salt and pepper.
3. In a ziplock bag, place breadcrumbs, garlic powder and cheese and shake well.
4. Spray cookie sheet with cooking spray and set aside.
5. Cut zucchini into small strips. Make them about the same time so they cook even.
6. Dip zucchini sticks into eggs then into bread crumb and cheese mixture, a few at a time and shake to coat.


7. Place the breaded zucchini in a single layer and spray more cooking spray on top.

8. Bake at 425° for about 20-25 minutes, or until golden brown. Serve with 1/2 cup marinara sauce for dipping (.5 pt)

I really enjoyed these! My husband liked them too! You can also add any spices that you'd like!

ENJOY!!

Here is the website I got the recipe from:

Wednesday, February 15, 2012

Bling Shoes


I saw these on Pinterest and thought "oh no, way to much for a little girl!" As I continued to scroll through Pinterest, I kept coming across them. They soon began to grow on me and I wanted them for my daughter! * Lightbulb!* Another Adventures in Pinterestig project!

Details:
About $26 to make
Time consuming- about 1 hour
Not to difficult if you can deal with tiny pieces

Materials:

Shoes- I love Converse! $17.99 Target
Bling- I used Bling on a Roll by Recollections. $4 Michaels
Toothpicks
Ribbon- of your choice. $1 Michaels
Amazing Goop- borrowed mine

1.
Clean the rubber where the bling will go. I used soap and water. Rubbing alcohol might work well too. Makes sure it's really dry.

2.
Put your bling on. The Bling on a roll are jewels with a tacky back, all connected. I actually used this as a cheat! I just pealed and placed! They sticky is pretty gooey and they aren't moving very easy BUT I have not let her wear them yet! So, I used the Amazing Goop on the 2nd row (second as in second strip) down. I just squeezed a strip of Goop and placed the bling on top.
**Here lies the frustrating part. Making the bling look good and line up. Different size shoes will line up differently. My shoes were Toddler 6. Towards the bottom I cut the jewels into singles and placed them where they looked good and fit. I used the toothpicks to help place them.  It took time and patience's! And by all means, it's not perfect!

3.
Thread the ribbon for laces. This is an option. Of course the ribbon will bunch up, get dirty, come un-tied a million times a day, but it's up to you!! It does look adorable!!
Notes:
*Now, this project is in no way useful, needed, super easy, cheap or practical but it does look cute! Not one of my favorite projects but I tried it and probably won't do it again.
* There is special glue, tools and more expensive quality jewels out there but I wasn't doing this to resale and make money. I did these to try out and give my daughter some cute shoes that she LOVES! They grow out of them before they even wear them out!!
* So have fun. Put bling all over the shoes if you want! You can be as creative as you like!!


The Pinterest inspiration:                                                    What I did:
(This one did not have the original
website attached to it.)
Famous Footwear has cute converse for cheap.


Sunday, February 12, 2012

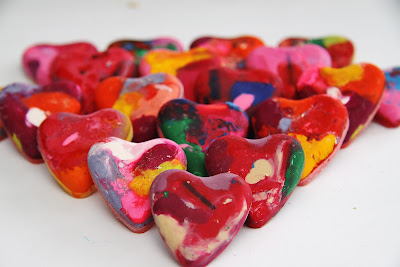
Melted Heart Crayons


These are so cute!! They really weren't that hard to make but having never done it before, there was some trial and error. Remember, I'm not really that creative so some things that would be common sense to some, really aren't to me. This is why I do this blog! For us "creatively challenged" people!!

The project on saw on Pinterest, for one, didn't really give detailed instructions, and two, glued these hearts to card stock with little messages on them for Valentine's Day. A lot of the comments from that project were about not being able to keep the hearts on the card stock without hot gluing. I don't want the kids to have hot glue on their crayons! So, I was determined to make these for my sons class and make them just as adorable without the hot glue!

Details:
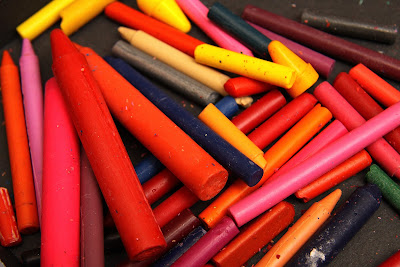
            Cheap! Most parents have a million broken crayons around the house!
            Easy (once you use my detailed directions).
            Not to time consuming, especially if you have your husband help cut the crayons!
            So many different shapes you can use for any occasion!

Materials:

          I used hearted shaped, silicone molds from Target. about $2 (last year)
          Crayons. Best to use all the same brand. Free or about $1-4 anywhere
          Blade or sharp knife
          Baking sheet (not pictured)
          (I didn't use the colored pencils pictured)

1.  Preheat oven to 230.
2. 


Strip your crayons of all the paper. The quickest way I found was to gently cut the paper down the crayon lengthwise. Then it just falls off in one piece. I also found out the hard way that using crayons of all the same brand work much better! When I used all different kinds, some melted and some didn't. I ended up throwing some out.

3.


Cut the crayons, with the blade or knife, into about 1/4 inch pieces and place them in the silicone molds. Again, I learned the hard way, make sure they are all about the same small size. I know, common sense to some I'm sure, but me.......I just don't have crafting common sense! By the way, I made my husband cut up most of the crayons! It wasn't hard at all, I just wanted him to help!

Fill the molds all the way to the top but make sure as it melts, it won't spill over. Try to arrange the pieces so that you fit as many as possible in each heart. You want them as thick as possible so the kids don't break them as they color.

4.


Place the silicone molds on a baking sheet. These helps when you take them out of the oven they stay even and don't spill.

5.
Place on the middle rack in the oven at 230 for 15 minutes. I did 5 minutes at a time to watch them carefully. Remember all ovens are different!

6.


Let cool for at least 30 minutes. I'm sure it depends on how thick yours are. My first batch I let cool over night only because I pulled them out at 11pm and went to bed.

Then "pop" them out. They come out pretty easy. I think the silicone is the way to go with these. I couldn't imagine trying to get these out of something hard.


Then I put them in a cute bag with a note on it! Must easier then hot gluing them all to card stock!
* My son goes to a Spanish immersion school so they are in Spanish and I've blocked out his last name. They say "You Color My World!"*
 BUT because I'm a busy mom and had a whole lot of things to do this weekend, I ended up making little simple baggies. They were much quicker! Besides the kids wouldn't appreciate the nicer one anyways!

** It says "You Color My World!" **
Notes:

So, I changed up the original Pinterest post a bit and came up with my own ideas. Over all a great and easy project! I will do these for Halloween and Christmas too!
Have fun!!

Friday, February 3, 2012

Next Project!!


I'm so excited to start working on this project!! It's such a great idea and perfect for giving out as gifts to the grand parents! Now, this one that I found on Pinterest involves a lot of power tools. It's not that I'm not capable or not willing to use them, but I want to make it easier and just as fun!! Stay tuned!!

Valentine's Day Clothes Pin Pot


I came across this on Pinterest and thought it was so cute and so easy!

Details: Very easy and very cheap to make! Something that the younger kids could make too!

Materials:
                      Walmart and home: total= under $4!!
              Empty and cleaned out tuna cans. I used the smaller one but the bigger size will do.
                     20 clothes pins (for the smaller can)- about $3 for a pack of 100
                     Paint of any color - I had on hand
                     Soil (only about 1cup)- free if you use dirt outside
                     Seeds or plants of your choice- seeds are cheap or replant an outside flower

Directions:
                1. Paint clothes pins any color you wish! You can paint the whole pin inside and out
                            or just the outsides, up to you.


                       2. Pin them on the can. You might want to poke small holes in the bottom of the can
                          for watering.   ( I forgot to!)


3. Put your soil in and plant your seeds!!

Likes: I loved that this was so easy!! The kids had a blast painting and pinning! Now they get to watch their plants grow! There is so much you can do to change this up. Paint Christmas or Halloween colors, use glitter, write love notes on each clothes pin. The creativity is endless!!!

Dislikes/Changes: Not much to change!

The one I saw I Pinterest didn't paint the clothes pin, it look really nice still. They also showed using it as a votive holder.

Create your own master piece and share with us!!